 |
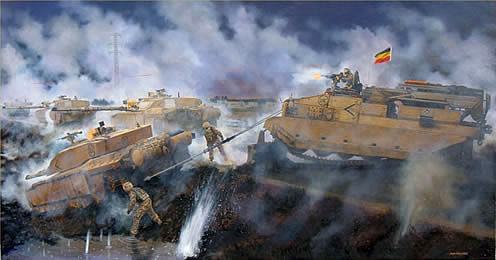
'Thrown Tracks' Between 27 March and 4 April 2003, C Squadron The Royal Scots Dragoon Guards was attached to 40 Commando Royal Marines on the Al Faw peninsula. Corporal Justin Simons was the squadrons recovery mechanic. Corporal Jason Garrett was the commander of the squadrons Challenger Armoured Repair and Recovery Vehicle (CRARRV), and the technician was Corporal Rick Parker. At dusk on 29 March the squadron was committed to Operation JAMES, a 40 Commando clearance operation around Abu Al Khasib. During the late afternoon of 30 March, 2nd Troop C Squadron was providing intimate support to a Royal Marines company clearance operation. A Challenger 2 tank became decisively engaged by the enemy, armed with rocket-propelled grenades, machine guns and mortars. Both its tracks were thrown and it was disabled to the side of a narrow causeway, attracting more concentrated fire. A CRARRV commanded by Corporal John Morgan was initially tasked to recover the tank. After hours of intense enemy attacks whilst preparing and connecting to the Challenger, its winch became inoperable and it had to withdraw. After safely evacuating two members of the stricken tank and his own crew, Corporal Morgan then joined the squadron CRARRV commanded by Corporal Garrett, who was now tasked to complete the recovery. As darkness fell and under attacks from rocket-propelled grenades, small arms and mortar fire, Cpl Simons and Cpl Morgan took charge of the recovery operation. They both dismounted, and Cpl Garrett provided close protection by operating the General Purpose Machine Gun (GPMG) from his turret, while the enemy mounted numerous attacks. This is the period depicted in the painting. The CRARRV and the Challengers discharged their smoke to cover the operation. Major Biggart, the Squadron leader, requested 29 Commando Regiment Royal Artillery to fire smoke rounds onto the position. The tank was successfully winched onto the road, but due to the poor light, enemy action and confusing situation, the tank slipped down the other side of the embankment and became stranded in an even more difficult position from which to recover it. For the next six hours, in complete darkness, Cpl Simons struggled to break both tracks conventionally before finally resorting to arc-welding equipment, a brave decision, as the light given off highlighted his position. This was unsuccessful, and it was decided to try the unorthodox by organising a CRARRV on CRARRV recovery, which succeeded in dragging the tank back to safety, nine hours after it had become disabled. Corporal Garrett and Corporal Simons were both Mentioned in Despatches for their leadership, calmness and disregard of their own safety. I visited the scene shortly after this action with Major Biggart. The track marks in the crumbling earthen banks on the slope of the causeway and the marshy ground at the bottom clearly showed where 'Two One' had been extricated from its predicament. While we stood here I was able to make a sketch of the terrain. When I was in bivouac with the Royal Scots Dragoon Guards, Cpls Simons and Garrett explained the recovery process and showed me their CRARRV. Contrary to orders, the REME flag was flying from an antenna throughout the action. Medium: Oil on Canvas Printed image size(s): B2 only (58 x 38 cm) Owner: Warrant Officers & Sergeants Mess, RHQ REME, The Prince Philip Barracks, Lyneham Price(s): £75 |